 Tweet this!

I've seen a few tutorials online for creating pencil-like and chalk-like drawings, images, and words using various brushes and downloadable tools.
But then I was on the train for an hour, wanting to create a Wish List and draw arrows using a "pencil," and unable to get online and download anything.
Sometimes when we're sans-internet, we curse the internet gods. Sometimes, it makes us get creative and figure-sh*t-out.
How-Do-Ya-Do-It?
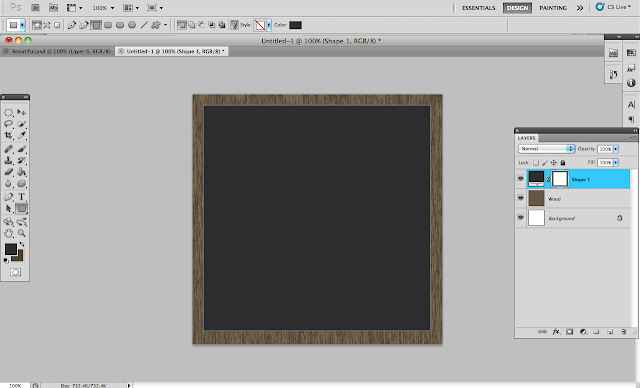
For this example, I started with a wood background, so that my chalkboard would appear to have been framed. To do this, choose a dark brown color and use the bucket tool to fill the background. Then, also select a lighter brown color (think coffee with cream). Select Filter>Render>Fibers. I used "Variance" = "43" and "Strength" = "64"
Chalkboard:
1. Choose a dark gray ("slate"-like) color and create a box shape that is slightly smaller than the wood background.

2. Duplicate this shape so that there are three dark gray boxes. Name them Chalkboard 1 (bottom layer), Chalkboard 2, and Chalkboard 3 (top layer).
3. Select Chalkboard 2. In addition to the dark gray slate color, add another gray that is significantly lighter. Then go to Filter > Render > Fibers and make the "Strength" = "1" and the "Variance" = "9"
Note: You may be asked to rasterize the shape. Click OK.
4. Change the Opacity of Chalkboard 2 to 40%.
5. Select Chalkboard 3 and go to Filter > Render > Difference Clouds and choose Darken Only. Note: if your second gray color was not light enough, this may not make much of a difference. Feel free to repeat Filter>Render>Difference Clouds to make this more apparent, if you'd like.
6. Change the Opacity of Chalkboard 3 to ~15% (here I used 13%).
Chalk writing:
1. Create a new layer and choose a pencil tool with the following specs, then draw to your heart's desire...
Size = "1px," Hardness = "0%," Opacity = "35%," Color = Light Gray Variation (you can always make it darker by making it more opaque later).
2. Select Filter>Stylize>Diffuse and choose "Darken Only"


Thanks so much for linking up to Blissful and Domestic Sunday Blog Hop. Hope to see you back tonight.
ReplyDeletehttp://blissfulanddomestic.blogspot.com/2012/03/sunday-blog-hop-4_10.html
I think it is very useful content.
ReplyDeleteAdobe Photoshop Extended is encased by and large of Web Shop Images Editing imaginative Suite offerings with the exception of style ordinary, which has the Adobe Photoshop release.
ReplyDeleteDiverse modules, channels,clipping paths inclinations and different alternatives in visual depiction makes any question alive and excellent.
ReplyDeleteI recently came across your blog and have been reading along. I thought I would leave my first comment. I don't know what to say except that I have enjoyed reading. Nice blog. I will keep visiting this blog very often. Deep Etching Services This is such a great resource that you are providing and you give it away for free. I love seeing blog that understand the value. Im glad to have found this post as its such an interesting one! I am always on the lookout for quality posts and articles so i suppose im lucky to have found this! I hope you will be adding more in the future...
ReplyDeletegood information.Gorgeous this web page will be famous amid all blogging users, due to it’s fastidious content and article.
ReplyDeleteIt is a very nice post. thanks for sharing!
https://www.clippingpathexclusive.com/
Deep Etching Service | background removal service | clipping path | remove image background | Ghost Mannequin Service
It feels like you wrote this just for me—so relatable and on point.
ReplyDeleteVisit Here: eCommerce Image Editing Service