Showing posts with label decoration. Show all posts

8.19.2013

Rehearsal Day, Part Two - Rehearsal Dinner

Pin It Print Friendly and PDF

**Read Part One from the day of our Rehearsal Dinner here!**

The drive from our ceremony space to the rehearsal dinner was about 30 minutes with traffic, so we all split up into various cars. My then-fiance was heading home in between to change clothes,  but my bridesmaids, some of their dates, and I arrived at Fulton's On The River at about 6:30 for our 7:00 Rehearsal Dinner.


The event planner was still putting the finishing touches on the space, so we ordered a drink at the bar while we waited. I had something called the Kurt Cobain. I have no idea what was in it, but I liked the name, so I guessed. It was delicious.


One of my bridesmaids ordered a drink that had champagne and elderflower liqueur. So delicious. Reminded me of a cocktail I had at Old Oak Tap over Memorial Day Weekend.

Champagne and elderflower liqueur. Winning.
It wasn't long before they were ready to bring us to our event space. One of the employees came down with a framed sign for us and then lead us to our space.


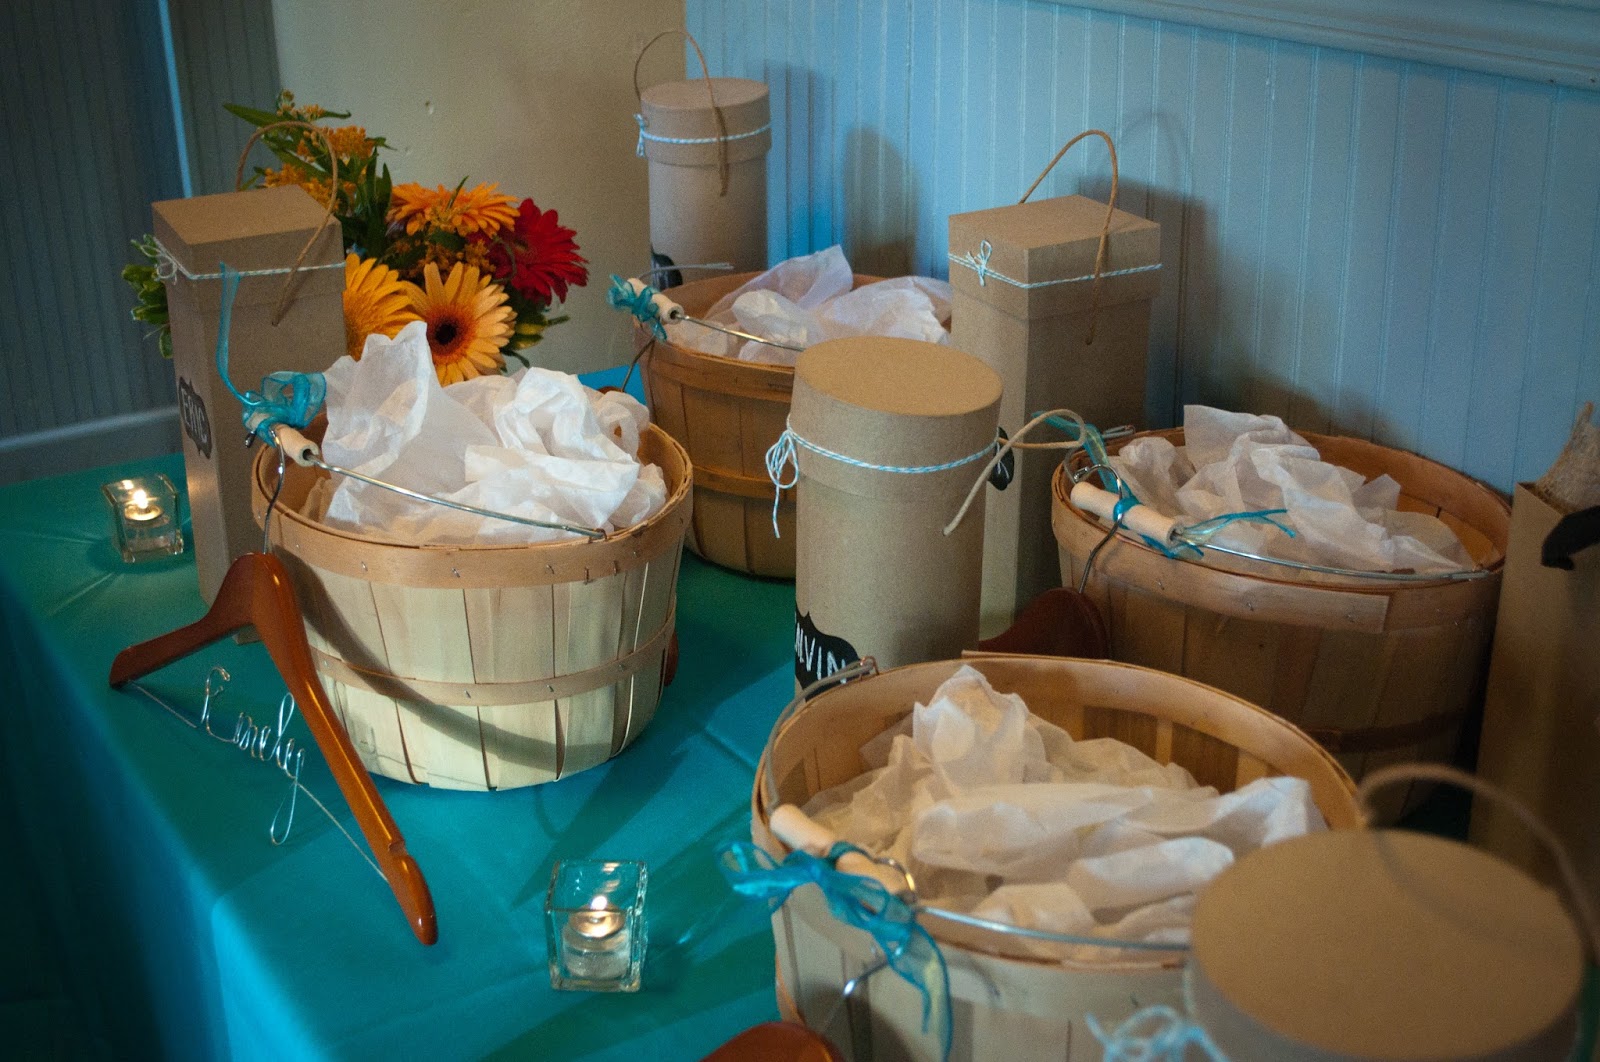
Inside, the room had been decorated beautifully as per my Mother-In-Law's specifications. The room, which started out being pretty plain, had a beautiful pop of color, with the turquoise linens and bright flowers.


I had coordinated with my MIL to wrap the gifts in a way that complimented the decor. So, my gifts were wrapped in natural wood colors with turquoise accents (Curious about what we gave as gifts? That's a separate post, because it was awesome. Coming soon to a blog near you...).


After getting situated and checking out the space, we snapped a quick pic of the ladies in my bridal party. I am so lucky to have such awesome and gorgeous ladies in my life. #Spoiled


After dropping our purses and checking out our private room, we headed outside to the terrace for passed appetizers. Servers came outside to pass around bruschetta...


...and some delicious crustinis with brie and jam (among other things). It was so nice that the apps were passed, because it allowed us to keep socializing and focusing on each other without breaking off to get finger food. This meant more time to talk to our favorite people.


It also meant we could hang out on that beautiful terrace! Fulton's On The River is exactly where its name suggests: On the Chicago river. Because it is right in the middle of downtown, there is a really special feeling of being on the water yet in the middle of huge skyscrapers. It had a magical, energetic feel to it.


Just like our hotel rooms and the ceremony rehearsal, this area has such great city views and wonderful natural lighting that almost every picture looks amazing. I have a minor photography obsession and my MIL does, too (she probably loves it even more than I do!), so it was the perfect setting for our families to celebrate in!

Wearing: Dress, Victoria's Secret. Shoes, Nina. Pave Bracelet, J. Crew. Earrings, Tory Burch.
We eventually headed back inside for dinner. I was very much looking forward to having dinner here, because it has a great reputation as a steakhouse and their food is always delicious. I had the house salad, steak (other options were provided, but I have a personal rule that when filet mignon is an option, I choose it!), and a fruit plate for dessert (though some other options included chocolate cake or a banana cream pie!).

Personalized menu for the win!

As we sat down, my almost Father-In-Law got up to give a little toast and a prayer. He is extremely eloquent in his speech and it was so tastefully done, as always. In fact, it was so well done that one of my bridesmaids later asked me if he was a preacher! #PreachIt


As the main course was being cleared, Justin got up and told everyone that we had a few gifts to distribute. We gave gifts to our bridesmaids, groomsmen, and Justin's mother and father. Better pics to come later... can't ruin the surprise!


After dinner and gifts, we spent a bit more time chatting with friends and family, and hung out on the terrace a bit more. I am still a little bit in awe of how perfect the terrace area was. It was just so full of city vibrancy that it only enhanced my excitement for the festivities! 


...to be continued...

12.17.2012

5 Tips For Alternative Christmas Decor

Pin It Print Friendly and PDF

When it comes to Christmas decorations, I'm non-traditional. So, some of you will hate this post because you swear by the red and green decor, the Santa figurines, the stuffed animal reindeer. Try not to hate me! We're all different.

When it comes to finding alternative, modern ways to decorate your home (or apartment) for a Christmas party without becoming swallowed up in the red and green, here are a few tips!

1. Globe Lights
First, purchasing interesting lights will help with the nontraditional vibe. Look for large globe lights, or the larger oval bulks. Consider stuffing a few of the lights into a mason jar (I found a blue mason jar a few months ago and it worked beautifully here).

(Large globe lights stuffed into a beautiful blue mason jar)
2. Homemade Signage

Then, to up the ante, make your own festive signage. I posted a tutorial over the past few weeks to show you how to make the sign pictured above. I'd suggest decorating with doilies, stamps, or anything you can glue on (I seriously considered Mod Podging glitter all over the place, but didn't want to end up with an obscene amount of glitter on my couch, because we all know glitter tends to spread like, well, let's go with the flu and keep it PG).


3. Framed Signage
For those of you who don't have the time to put together a homemade sign (or perhaps you can't find a good place to put it), there's also a much easier way to include special quotes or phrases. In particular, this works well for quotes that are too long to put on a sign, like lines from poems or music.

Justin and I love this line from a traditional Christian hymn, so I wrote it out and framed it. It's not exactly in the holiday spirit, but it's a good reminder to keep your thoughts on what the holiday is all about.


4. Ornament Display
Instead of displaying all of your ornaments on your tree, create a festive display on a countertop by placing a few ornaments in a small (or large!) bowl or glass. I suggest going with ornaments that are in a similar color scheme. You can work with your existing collection, or stop by Home Depot to pick up a package of ornaments in the same color family.

I put the ornaments in a thrift store bought, Kate Spade-esque bowl that was a gift from my Aunt Betsy and Unka Toby as at my housewarming party.


5. Unconventional Colors
You may have noticed as you browsed the images in this post that my color scheme for Christmas decor is somewhat unconventional. To replace the traditional red and green, I used blues, silvers, and other "cool" hues to keep things fresh. In picking these colors, I was inspired by snow and ice, by songs like "White Christmas" "Let It Snow."

I also played around with a new Christmas tree idea. For those of you who, like me, are renters and city dwellers, sometimes it's just a big hassle to get a live Christmas tree in the city, haul it to your place (or pay for it to be delivered), and then deal with disposing of it afterward. Instead, we went with a small, shiny white tree from my mother and decorated it with blue Christmas ornaments.


We also strung blue ornaments in front of the windows, to add a bit of festive flair without making things too cluttered.


2.07.2012

DIY Decor | Ampersand & Art

Pin It Print Friendly and PDF
Remember when we gave Justin's living room a makeover? Well, more to come on that (after more than a few changes-and-re-arranges and a thrift store shelving adventure)... but, for now, I'd like to announce: the decor has spread. To the bedroom.

You might remember that the living room was full of bold colors, of which red somehow became the favored child. Well, this room will turn out to be the calmer, softer brother. We've only just begun...


I’ve wanted to make Ampersand art for a while now but was semi stumped on how to do it in a unique way.

I considered painting an ampersand onto a large scrap of wood or canvas, but it felt very “done before” and never came to fruition.

Then, while walking the halls of Ace Hardware (my personal “Eureka” location), Justin and I found a large sheets of Acrylic Transparency. They’re about 1/4 an inch thick and are pretty amazing. Without a fully formulated plan, we grabbed it.

We ended up spray painting around the Ampersand, so that the “background” of the piece is blue, and the ampersand, itself, is see-through. That means we can swap out what we place behind the art, to fill in the ampersand with any fabric, magazine clipping, or page from a book that we choose.

I'm still pretty obsessed with the idea. Why? Because it will always match. We can put anything behind it and instantly change its color and effect on the room.

How'd we do it?

Start with a transparent acrylic sheet...


Use painters tape (masking tape) to cover the sheet. I had almost covered the entire sheet when I realized I only needed to cover areas which would be used by the "&" we printed out (as that was the only tape we would be leaving on the board).

Choose an ampersand (&) in Microsoft Word, enlarge it to your preferred size, and print. We tried a variety of fonts (really, we had a few pages worth of samples) but ended up going with good old Times New Roman. I was, at first, stern on my sans-serif stance and convinced we would be going with something smooth... but, as we checked out various samples, we decided that Times New Roman had something really classic about it. It reminds me of newspapers and journalism. And, in the end, it just felt like the right thing to do. We made it as large as we could and printed it out.


Cut loosely around the edges (so that there is still white space, and enough room for tape) and then tape onto the sheet where you would like the ampersand to show up.
Use an exacto knife to cut out the ampersand.


Remove the tape surrounding the ampersand. Do this slowly and have an exacto knife handy to do extra cutting in places you may have not fully cut.


Spraypaint the art (leaving the tape on). You'll need to do a number of layers in order to get a solid coat, because the background is see through. We did a whopping 6 layers of blue spraypaint before stopping.

Once the spraypaint has dried, slowly remove the ampersand tape. Use an exacto knife to help lift up the tape.

Choose any fabric, magazine, etc to tape behind the acrylic sheet and show through.

To hang, we hot glued a piece of metal "teeth" we yoinked off of the back of a picture frame.

Here are two final product shots:


And a few shots up-close-and-personal:


So yes, we'll admit, there is much to be done in this room... I'm working on four wall art pieces using silhouettes and some additional shelving... Get excited!

1.17.2012

DIY Decor | Spice World

Pin It Print Friendly and PDF

While thrifting a few weeks ago, we stumbled upon this fairly boring yet also quite functional spice rack. After recently having to throw away a few spices (apparently plastic spice bottles sitting on an oven causes melting. Whaaat?  Go figure), this was actually a thrilling find. Other than the boring-ness.


And yet, I have to say, we had caught what I’m calling Red Fever. It is contagious and it is powerful and it may cause you to buy red things, paint things red, and daydream about red spraypaint. 


So here we are. With a can of Rustoleum in Sunset Red from Ace (love those guys at Ace, can I have around of applause for those fine gents?!), we have added yet another bright red fixture to the world. What can I say? You caught us red handed.


A word to the wise: TWO COATS! (Okay, that was two words)

Don't freak out if you can't get every nook, cranny, and scratch covered on your first coat. Tw is fine. Three works too.

12.19.2011

Rustic Hardware & Faucet Coat Hanger

Pin It Print Friendly and PDF

Justin and I quite recently gave his living/dining room a makeover. After putting so much effort into such a small space, it quickly became apparent how important tidiness is. The simple act of dropping my coat and bag on a chair when I walked through the door was enough to somehow unbalance the beautiful room.

And thus, the need for a coat hanger was born.

After various discussions about purchasing a coat hanger (we were seriously considering purchasing deer antlers and painting them white or red to mount as hooks), some real, genuine, bona fide inspiration came my way. As I strolled down the aisles of Ace Hardware, a Boiler Drain (yes, you read that right) jumped out at me. Yes, it jumped. Out of the basket and into my hands (and heart, oh, the drama).

Thirty minutes, two sales associates, and 5 picture messages later, my arms were filled with two Boiler Trains, a piece of wood, and a Sink Faucet.

After deciding on our hardware, the good folks at Ace Hardware gave our wood a good drilling (and cutting, oh my). We walked out with these goodies...


Our first consideration was to make sure our "assemblage" strategy would work to secure the Boiler Drains to the wood.


To assemble the pieces in a way that solidly and dependably attaches the Boiler Drain 'hooks' to the wood, we needed a "nipple" that screws into the back of the Boiler Drains, goes through the hole drilled in the wood, and then screws into a pretty thick washer on the other end of the wood.


Once the Boiler Drain was attached, we simply screwed the center "faucet" into the wood. Because the threading on the faucet was on the outside (as opposed to the Boiler Drains, which were threaded on the inside), the initial hole in the wood was drilled to be just small enough so that we were able to hand-screw it in, creating threads in the wood as we pushed it through.


Because the wooden shelves lining Justin’s walls are a much darker wood than what Ace Hardware had on hand, the first order of business was to stain the wood to match (or at least pass for matching). We un-attached the Boiler Drains and faucet and stained the wood using an old can of cherry wood stain.


After staining the wood with an old brown washcloth, we left it to dry for a full day (which is quite an accomplishment for someone this impatient...).


Post-staining, we hand screwed the faucet back into the wood, silently praying the wood wouldn’t splinter any more than it already had. We then screwed nipples (yes, that’s actually the technical term) into each Boiler Drain and added the bolt on the back to secure them.


We're hanging it this week! Will keep you updated :)

Related Posts Plugin for WordPress, Blogger...
Blogging tips