


 Tweet this!

Why does your bedroom still look like a dorm? Probably because you don't have a headboard. Since all you really need is one credit to graduate, you might as well put in four hours of work and get it out of the way. Here's what you need:
- Wide Boards cut to size (Measure your bed for width, and decide how high you want the headboard to stick out above your mattress. We decided we wanted w60"xh42")
- 2 - 5 ft long 2"x10" boards
- 2 - 5 ft long 2"x12" boards
- Braces for the back - 3 - 40" 2"x4" boards
- Wood Glue
- Screws - 1"
- Sandpaper
- Wood Conditioner
- Stain


What kind of wood? We chose
pine. We had Home Depot cut the straightest pieces we could find in the store.
Check the front and back of each board to decide which side should be showing. We wanted character for this headboard so we were willing to let the
character of the wood show through. Luckily, cheaper wood has a lot of
character, and by character I mean knots and imperfections.

We didn't want any hardware showing on the front of the headboard, so we decided glue would be our main bonding agent for bracing the headboard. We prepped the "connection" by letting glue dry (overnight) on the sides of the brace and the back of the headboard that would eventually be connected. DO NOT attach the braces to the headboard at this step. Just let the glue dry on the surfaces.
After the glue has dried, we drilled pilot holes through the braces for screws. We used 1" screws so they would go through the brace, but there was no chance they'd make it through the front of the headboard.
I know what you're thinking -- Why screws if you've already glued it into oblivion? Isn't that overkill? I thought the same thing before a long conversation with the guy at Home Depot... As it turns out, the screws help the glue bond evenly to the surface of the wood. We used three screws per board per brace. 4 boards x 3 braces x 3 screws = 36 total screws.

With the headboard flat on the ground, we put fresh glue over our dried glue (that means 2 layers of glue on each piece; one layer of already dried up glue and 1 layer of fresh glue), screwed the braces into the headboard, and put weights on the braces (to hold them flat) and let the glue dry for 8 hours. By "weights," I mean big buckets of junk that was sitting around in my basement. Seriously, I'm pretty sure there are computers from 1999 in there.
After a few hours of drying, our headboard was solidly constructed and ready for the finishing touches!
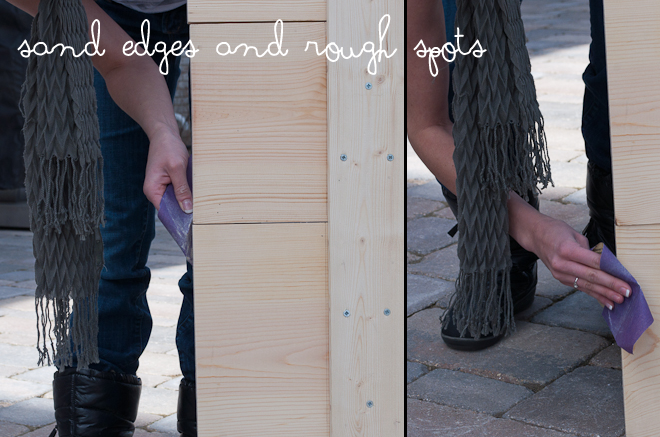
To prepare the headboard for the finish, we had to sand the edges as well as some of the spaces on the front between the boards.

This was to ensure that the stain could be applied fairly evenly and also to avoid the painful splinter my spazzy self would inevitably get. Seriously. You're going to be sleeping by this thing, so you don't want to get any splinters from it. Especially if you're accident prone (Hint: ME. Remember the old headboard at my parents' house that we re-upholstered after I not only broke it but also spilled COFFEE all over it with my FOOT?!).

We used a wood conditioner to prepare the wood for staining. It helps the stain finish more evenly... and avoids the situation we had with the On Air Box (I swear, the stain hated the wood. Or the wood hated the stain. Or vice versa. It was not a good relationship...).

Start staining the wood within 15 minutes of conditioning the wood. We used the leftover 'Tudor Satin' stain from the On Air box we created. Stain with the grain (it rhymes, remember it!) and smooth it out.
We wanted some texture and character, so we put it on extra thick in the places where the headboard would stand above the mattress. Have you noticed we love the word character?

There are a couple of ways that you can install the headboard. You can bolt it to your bed frame, or you can hang it from the wall, like a picture. Ours is simply placed behind the bed. At some point we'll probably bolt it to the frame, but we aren't ready for that just yet.
Why's it so short? It's covering a window and one of the best things about this apartment is its natural light. So, we decided to KISS (Keep It Short, Stupid?) and make the headboard tall enough to lean the pillows against with only a bit of extra room.

Do you love it?! (Say yes...) We're loving the combination of rustic with modern in this apartment. An old dresser with a schoolhouse chalkboard finish that's topped with sleek, modern drawer pulls. Clean looking Ampersand Art (with a cityscape background) next to big globe circus lights (they're LED and awesome - will share more on how we got those babies soon!).
Anddddddd......... Voila! Congratulations graduate! Now you're ready for your date with Mrs. Robinson!

It does look beautiful. Adds to the room very well. Great job! I like the ampersand art as well.
ReplyDelete