Showing posts with label low calorie. Show all posts

9.05.2014

DIY Blendicano Recipe - Frappuccino for 10 calories!

Pin It Print Friendly and PDF


The "blendicano" has been all over the fitness blog world. I don't know who figured it out, but everyone seems to be talking about it (don't believe me? check this out). It is apparently on Starbucks' secret menu, and it consists of espresso, ice, and syrup, blended like a frappuccino -- but sooooooo much healthier. Like, 200 times healthier. And that's not even an exaggeration.

I tried it... and twas amazing.


But, I do have one piece of "beef" with this drink. At Starbucks, your flavor/sweetener options are limited: you can get regular, sugar-laden syrup, or you can get "sugar free" aka full-of-cancer-causing-chemicals syrup. <--neither of those sound too good to me.

So, I decided to tackle it on my own using Nunaturals liquid stevia syrup. Here's my take on the famous blendicano:


DIY BLENDICANO RECIPE - STARBUCKS' SECRET MENU

Ingredients:

  • 3-4 shots of espresso (or, if you don't have an espresso machine, 1/2 cup of really strong brewed coffee will do)
  • 1 cup of ice
  • Sweetener to taste (even with the blendicano, people have different preferences - I'm a 2 pump girl, Sierra likes 4. You dig it? So, with this recipe, I go with one full dropper of liquid vanilla stevia).

Directions:

  1. Put all ingredients in a blender and blend that stuff up! You may need to use a tamper/spatula to keep things moving at first, but keep blending until the texture resembles a frap. **If things are too thick, try adding water about 2 tbsp at a time until you reach the right consistency!**
  2. Serve! MMmmm, drink it and tackle the world!

Why did I use Stevia?

  • NATURAL. Stevia is made from a plant that is very similar to mint, so it is entirely natural (like sugar). 
  • ZERO CALORIES. Unlike sugar, however, it has zero calories and...
  • HEALTHIER. ...it also does not put you at risk for the myriad of health issues sugar does. 
  • TASTES FREAKING GOOD. Oh yeah. There's that, too.


Liquid Flavors:

Stevia comes in powder (you've probably seen "Truvia" at the stores) and liquid form. When it comes to liquid stevia, Nunaturals have a lot of flavors, which gives you a lot of power to customize your drink. Since I'm not a huge fan of adding things like orange and lemon to my coffee, here are some of the flavors that I think could work (and a link to help you buy them ASAP!).


3.28.2013

Bacon and Spinach Egg Casserole - Paleo and Not Paleo

Pin It Print Friendly and PDF

After I made this delicious egg casserole for St. Patrick's Day fuel, a LOT of you asked me for the recipe. Now that I've eaten it all (for breakfasts and lunches), I totally understand why. Not only is it super delicious from the first, out-of-the-oven bite, but it also keeps very well in the fridge. I've been bringing them into work for breakfasts on my early days, and also having a piece alongside a salad for lunch. I'm telling you, when you reheat these babies, they taste like freaking pizza. You're welcome.

To be honest, this recipe initially came from my mother. She makes it using bread as the base. This is what I did for St. Patrick's Day, because I knew we would need some bread in our tummies to soak up the green beer. But, since then, I've also made it without the bread. It's totally up to you, so I've provided both recipes below.


Egg Bake with Bread

Ingredients:

  • 4 pieces of bread (I used 45 Calorie Sara Lee)
  • 10 Eggs
  • Pepper and salt, to taste (or Mrs. Dash, or Bobby's All Purpose Seasoning)
  • 1/2 cup shredded mixed cheese
  • 6 Pieces of Bacon, Cooked and chopped (I used uncured bacon)
  • 1 handful of rinsed Spinach, ripped or chopped
  • Pan that is at least 2" deep. You can use a cake pan or divide between a few different cupcake/bread pans.

Directions:

  1. Rip bread into small pieces and the line bottom of a greased pan.
  2. In a bowl, whisk eggs, salt, and pepper. Pour over bread pieces.
  3. Sprinkle cheese on top, then place spinach and bacon on top.
  4. Cover and let sit in the fridge overnight. (Optional)
  5. In the morning, pre-heat the oven to 350. Bake for approximately 40 minutes, or until a fork comes out clean.

Notes:

  • This recipe works for any add ins. You can use bacon... or make it meat-free. You can use spinach... but you can also use peppers, broccoli, you name it. Just feel free to add it on after you've poured the eggs into the container.
  • You don't have to soak this overnight if you don't want to. I frequently whip it all up in a Sunday afternoon. It's still delicious.


(Paleo) Egg Bake without Bread

Ingredients:

  • 15 Eggs (or 10 eggs, 8 egg whites)
  • Pepper and salt, to taste (or Mrs. Dash, or Bobby's All Purpose Seasoning)
  • 1/2 cup shredded mixed cheese
  • 6 Pieces of Bacon, Cooked and chopped (I used uncured bacon)
  • 1 handful of rinsed Spinach, ripped or chopped
  • Pan that is at least 2" deep. You can use a cake pan or divide between a few different cupcake/bread pans.

Directions:

  1. Rip bread into small pieces and the line bottom of a greased pan.
  2. In a bowl, whisk eggs, salt, and pepper (or Ms Dash). If you have a blender, you can do this in there and save some time (and your wrists from whisking carpal tunnel).
  3. Sprinkle cheese on top, then place spinach and bacon on top.
  4. Cover and let sit in the fridge overnight. (Optional)
  5. In the morning, pre-heat the oven to 350. Bake for approximately 40 minutes, or until a fork comes out clean.

Notes:

  • This recipe works for any add ins. You can use bacon... or make it meat-free. You can use spinach... but you can also use peppers, broccoli, you name it. Just feel free to add it on after you've poured the eggs into the container.
  • You don't have to soak this overnight if you don't want to. I frequently whip it all up in a Sunday afternoon. It's still delicious.


3.22.2013

Orange Whiskey BOKO Cocktail (Low-Cal and Sugar-Free)

Pin It Print Friendly and PDF

Happy Friday! It's official; we made it to the weekend. Breathe a sigh of relief in 3...2...1...

Friday might actually be one of my favorite days of the week, even though Saturday involves the most free time. There's so much potential for Fridays.

Especially on a day like today, when I have no plans. After a long and busy week, I'm pretty thrilled to be able to relax, work out, clean my apartment, and... well, whatever the heck my spirit leads me to do.

Thumbs up for Rock and Roll!

I made this cocktail recently. My fiance had poured himself some Maker's Mark on the rocks and sat down to sip it, and I wanted to play, too... but only kind of. So I made this. It's perfect for someone who appreciates the taste of whiskey... but only kind of (BOKO). I do like whiskey, but sometimes I just need to take the edge off of it - yes, even with a good batch like Marker's Mark (or our favorite Woodford Reserve).

Of all the flavors, one of my favorites to pair with whiskey is orange. Ever since trying a drink called the Barbed Wire Daisy at The Violet Hour, it's been my favorite combination. After experimenting with Orange Flavored NuNaturals in the 1920's Champagne Punch we served at our Speakeasy Party, I was dying to try it again.

This cocktail is very simple. Because, to be honest, I kind of think a drink with great whiskey in it should be simple.


Low Cal Orange Whiskey

Ingredients:

  • Ice, half-way filling a short cocktail glass (Or a tall one, I guess, if you're brave)
  • 10 drops Orange NuNaturals Flavored Liquid Stevia*
  • 2-4 ounces Whiskey (I used Maker's Mark)
  • Optional: A straw (My fiance would probably consider it a sin to drink whiskey from a straw. I, on the other hand, have no qualms about it)

Directions:

  1. Fill a short cocktail glass half-way with ice.
  2. Add Orange NuNaturals (or Orange/sugar combination - see below)
  3. Add Whiskey
  4. Stir or swirl! And drink!

Notes:

  • Don't have Orange NuNaturals Flavored Liquid Stevia? Never fear! You can combine 1/2 tsp Orange Extract with 1 tsp sugar or stevia powder... or combine with orange zest!


2.07.2013

1920s Champagne Punch (Speakeasy Party Part 3)

Pin It Print Friendly and PDF
Despite having a pretty full array of cocktail options at our Speakeasy party, we noticed that our guests were pounding the Champunch (Champagne + Punch = Champunch). 

At first, I thought this was the result of my frequent bragging that the punch was low sugar (I used NuNaturals and naturally sweet tea, see below). But, when I realized it was men and women alike who were pounding the punch, and I actually had to scramble to re-make a second batch to avoid a mutiny (ha), I figured something out:

This sh*t is actually just down right delicious.


On Saturday morning, I started googling around for 1920s Champagne Punch recipes. I didn't plan on legitimately following a recipe (what do you think I am, a grown up or something?), but I wanted to get an idea for what might be unique about punches during that era. The answer? Tea.

Every single 1920s recipe I found incorporated some sort of tea. So, with that in mind, I hit up my pantry in search of the most delicious tea. I have on hand four kinds: Green Tea, Mint Green Tea, Chamomile/Sleepy Time, and a Red Tea that is "Good for your skin." After about 30 seconds of contemplation with my cousin ("Do you want to be feeding people caffeinated tea at 12am?" or, really, "Do you want people staying alert and awake and thus staying at your apartment until breakfast?" I love my friends, but... no thanks), we opted for the non-caf Red Tea. It ended up being perfect because red tea is significantly sweeter than its bitter cousin, Green Tea, so it sweetened up the punch naturally.

We also added a few bottles of champagne, some white wine, rum, and some Orange-flavored NuNaturals, then topped it off with slices of oranges that we peeled to make the orange twists. In the end, we ended up with this delicious recipe:

1920s Speakeasy Champagne Punch

Ingredients:

  • 3 peeled Oranges
  • 3 cups Brewed Red Tea
  • 1 bottle White Wine
  • 1 cup Dark Rum
  • 1/2 Tablespoon NuNaturals Orange (Can substitute with 1 tablespoon sugar/stevia and 1 tsp Orange extract, if absolutely necessary!)
  • 1/2 Cup Rum
  • 5 NuStevia Quick Dissolve Tabs (Can substitute with another tablespoon of sugar/stevia)
  • 3 bottles Champagne

Directions:

  1. Slice oranges horizontally (hold the orange so would naturally separate into vertical slices, then slice it the other way). Place in a bowl and put in the freezer as you prepare the rest.
  2. In a large bowl, combine red tea, white wine, rum, and sweeteners (NuNaturals Orange and NuStevia, or sugars) and mix well.
  3. Add Champagne and Orange slices just before serving (or before guests arrive).
  4. We dumped about 5 cups of ice into the bowl, just to keep it nice and chilly!


1.31.2013

Protein Shake Revolution - In Search of the Perfect Meal Replacement or Snack Shake for Fitness

Pin It Print Friendly and PDF

A few weeks ago, one of my coworkers got me very interested in the shakes she was drinking. On the side, she is a rep for a company that provides shakes that are fairly high in protein and vitamins while still filling you up and being low calorie.

As I began searching for my personal substitute, I started digging around online to find out why this brand of shakes was so successful. The most common answer? Because it not only had protein, but it also had a lot of fiber, which not only helps you feel full, but also helps you... er... regulate.

So, naturally, I set out to concoct my own shake. My goals were to create a shake with the following attributes...
  • Could be a mid-morning snack or lunch replacement - I wanted to be able to just dump stuff into my shaker bottle and take it to work with me. So, ideally, all of the ingredients would be dry/powdered in form (otherwise, I would have to deal with things going bad or getting chunky before I was ready to drink the shake).
  • Good source of protein - It didn't have to be totally jam packed, because I do get a decent amount of protein in my daily diet (thanks to these cheesecakes). But, I did want it to have at least 15-20 grams of protein, to keep my metabolism going and help me feel full while also working on regenerating my muscles.
  • Good source of fiber - Since this was one of the highest reported reasons that people liked the other meal replacement shake I was looking at, I decided that it was a good thing to keep in mind for mine. That said, it was important that I incorporate fiber without making it taste too gross or chalky. That means no Orange Metamucil, friends.
  • Easy to make - I wanted my morning routine to just involve me adding a few scoops of this and that to my shaker. Nothing complicated. No time consuming prep work.

The Ingredients and Tools:
I ordered a bunch of Blender Bottles via GNC online on one of their Friday Deals (they were $5 each). I already had on hand a few different types of protein powder, as well as things like chia seeds and PB2 which can add texture and flavor, respectively. I also just ordered some vitamin filled powder online, which I'm looking forward to incorporating into the recipe, because it will make it even better. So, here are the items I've used:
Want it all? Click here to browse the entire shop for "Shake Revolution"

The Method:
I either fill my bottle at night or in the morning before I leave the apartment. Here's what I've tried so far:

  1. Double Chocolate: 3/4 scoop (or 1.5 Tablespoons) Chocolate Protein Powder, 1/3 scoop (or 1 Tablespoon, as the Vega One scooper is huge) Vega One Powder
  2. Double Chocolate Mint:  3/4 scoop (or 1.5 Tablespoons) Chocolate Protein Powder, 1/3 scoop (or 1 Tablespoon) Vega One Powder. Just before adding water/milk, add 3-7 drops Peppermint NuNaturals.
  3. Chocolate Peanut Butter:  1/2 scoop (or about 1 Tablespoon) Chocolate Protein Powder, 1/2 scoop (or 1.5 Tablespoon) Vega One Powder, 1 tablespoon PB2

I'm excited to try the seemingly unlimited flavor options I received from NuNaturals this week. Can't wait to share even more shake recipes with you!

1.17.2013

Protein Honey Cheesecake

Pin It Print Friendly and PDF

My Dearest Readers,

I am writing to let you know that I think you deserve the best. We're talking the absolute best. No cheap imitation, no dishonest fakery, nothing that pretends to be one thing and turns out to be another. Just the pure, honest to goodness, delectable best.

I think you deserve to eat something that is utterly delicious. You deserve to drool over the mere thought of such a sweet, tasty bite... and then, you deserve to consume it.


You also deserve to have all of these things without feeling guilty. After all, where is the beauty in consuming something so deeply gratifying, only to be left with regrets? I contend that it would be much more beautiful to ditch the guilt in favor of satisfaction. Contentment. Joy. Thankfulness.


And so, I made you this cheesecake. So that you can not only indulge your senses and give in to temptation... but feel proud of it. That's right. I said proud. You can eat this for breakfast to start your day out with a butt kicking of protein. You can eat it after a workout to repair your muscles. You can eat it day and night without feeling guilty, because you're not consuming empty, sugary calories.

It's just plain good.

Love,

Carly


Protein Honey Cheesecake
Adapted From: Blogilates (Her recipe includes berries - head on over and check it out if you'd like!)
Prep Time: <5 Minutes
Cook Time: 20 Minutes
Total Time: <25 Minutes
Ingredients for Cheesecake:
  • 1 cup 0% Fat, Plain Greek Yogurt (Oikos, Chobani, or Fage will all work, among others. I tried out Oikos for this recipe)
  • 2 tbsp Low Fat Cottage cheese (I used 1% milk fat)
  • 1 tbsp Whole Wheat Flour
  • 1 tbsp Lemon Juice
  • 2 Whole Eggs
  • 1/4 Cup Vanilla Whey
  • 1/4 Cup Stevia

Indredients for Crust:
  • 6 pitted Prunes
  • 1/4 cup slivered almonds (they break up faster than whole ones)

Directions:
  1. If making a crust, combine prunes and almonds in a food processor and blend until they form a rough gravel. If you don't have a food processor, you can finely chop the prunes and break up the slivered almonds with your hands into tiny pieces and then mix well with your hands. Then, distribute crust into a greased cupcake pan and press down to make it a compact layer.
  2. Combine all cake ingredients in a blender and blend for about 20 seconds or until smooth. 
  3. Pour the mixture into the cupcake pan (if you included a crust, you'll pour this over that), filling to about 3/4 full. This mixture will not rise the same way a real cupcake would.
  4. Bake at 325 degrees for 20 minutes.

Notes:
  • Blogilates includes a recipe for the crust. While I did make a few of these with crust, I contend that it's not particularly necessary. They're just as delicious without the crust. That said, I did modify the crust recipe to make it slightly lower calorie. It's a very thin crust that pretty much only serves to add just the tiniest bit of crunch.


10.10.2012

60 Minutes to Lunch and Dinner for a WEEK!

Pin It Print Friendly and PDF


This is the secret, my friends. "The secret to what?" you might ask. Well, the secret to nutritious food, a balanced lifestyle, high energy levels, fitness, losing weight, staying healthy... the list goes on and on.

The biggest hindrance for most of us when it comes to those goals is time and preparation. For example... 
  • Maybe you know you should be eating a healthier lunch, but it slips your mind so you forget to pack something to bring to work and end up settling on grabbing something from Jimmy Johns (note: 95% of their menu is NOT healthy) or Panera (also NOT healthy).
  • Maybe you simply can't find the time in the morning to pack yourself a salad.
  • Maybe you manage to make yourself lunch one day, but you can't find the time every morning to make it happen.
  • Maybe you did a great job on lunch, but by the time you get home, you just don't have the energy to make yourself a healthy meal.
  • Maybe you keep buying healthy ingredients, but then you don't use them up before they go bad, so you feel discouraged.

Case in point? There are limitless reasons you might feel discouraged. But guess what? All you need is 1 hour on Sunday. In the morning, in the afternoon, at night. It can even be fun! I did it this week while watching an episode of Nikita on my lap top in the kitchen. 

This post will help you pre-cook salads and dinners for the entire work week within 60 minutes.

60 Minutes to Lunch and Dinner for a Week


WHAT YOU'LL BE HAVING: Because this meal plan is optimized for health and fitness, it is high in lean protein and fibers. You'll be making slow-cooked chicken breasts that will stay tender for a week, even if you re-heat them. A few servings of Quinoa to serve as lunches (so you don't get too tired of Salads) and dinner sides, too! You'll also be making delicious salads that have a laundry list of ingredients that will leave you happy and full!
  • 6 Large Chicken Breasts
  • 5 Lunch/Dinner Salads
  • 4 Small Quinoa Servings
PREP TIME: ONE HOUR, TOTAL! Prep the chicken first, then start the Quinoa cooking, then make the salads while you wait for the chicken and Quinoa to finish!
HOW TO EAT IT: Distribute evenly throughout the week. Here's an example:
  • MONDAY: Salad for lunch, Chicken and Quinoa for dinner
  • TUESDAY: 1/2 Chicken Breast and Quinoa for lunch, Salad with 1 Chicken Breast for dinner
  • WEDNESDAY: Salad for lunch, Chicken and Salad for dinner
  • THURSDAY: 1/2 Chicken Breast and Quinoa for lunch, Salad with 1 Chicken Breast for dinner
  • FRIDAY: Salad for lunch, Chicken and Quinoa for


Chicken


INGREDIENTS:
  • 6 Large Chicken Breasts, thawed (I used two packages of 3, Organic) 
  • Olive Oil (to coat the pan)
  • Italian Seasoning Mix
  • Aluminum foil
DIRECTIONS:
  1. Preheat oven to 325. 
  2. Line a 2inch deep (or deeper) baking pan with aluminum foil. Add a thin layer of olive oil over aluminum foil.
  3. Arrange chicken breasts in the pan, then sprinkle Italian seasoning over them. Use a fork to turn them over and sprinkle additional Italian seasoning on top.
  4. Bake for 45 minutes, then turn and bake for an additional 15 minutes. When finished, wrap pieces individually in aluminum foil so you can grab and go!
    Note: While the Chicken is baking, start cooking the Quinoa and prepare Tupperware salads!

Quinoa

INGREDIENTS:
  • 2 cups uncooked Quinoa, rinsed
  • 3 cups Water
  • 1 tbsp Cumin Powder
  • 1/2 tbsp Curry Powder
  • 1/4 cup Onion (white or green), chopped
  • 2 tbsp Pine Nuts
  • 2 tbsp Feta Cheese
  • 4 tupperware containers for storage
DIRECTIONS:
  1. Heat water to a boil, then add Quinoa, Cumin, and Curry. Reduce to a summer and heat, covered, for 20 minutes.
  2. After 20 minutes, stir in nuts. Wait until Quinoa has cooled a bit, then add Feta cheese. Divide cooled Quinoa into 4 small tupperware containers so you can grab and go!
    Note: While Quinoa is cooking, prepare salads.

Salads


INGREDIENTS:
  • 1 large bag Mixed Greens
  • 2 heads Romaine Lettuce
  • Onion (1/2 white onion or 6 stalks green onions)
  • 1/2 cup Feta Cheese
  • 1/4 cup Sliced Almonds or Pine Nuts
  • 1/4 cup Raisins or Craisins
  • 6 tupperware containers, for storage
DIRECTIONS:
  1. While the other items are cooking, rinse and pat dry the Romaine lettuce, then chop into bite sized pieces and combine with mixed greens. Distribute evenly into tupperware containers.
  2. Chop onion and distribute evenly into tupperware containers.
  3. Add feta, nuts, and raisins/craisins to tupperware containers and store.


And there you have it! 10 meals in 60 minutes!  
Pin this image to share!

Anyone else have a great trick you use to pre-cook?

8.14.2012

Healthy Apple Pie In A Cup

Pin It Print Friendly and PDF
It's easy, breezy, and the perfect way to say hello to Fall without diving all the way in. Just dip a toe into the season. It's appley and cinnamony and yummy, oh my!


I believe in dessert. I say that in a totally philosophical way and I mean it. I don't care how calorie-conscious you are, we are humans and we deserve a little bit of pure sweetness in our lives! 

That said, I will admit to being one who often skips desserts at restaurants. Why? Because I have no idea what they put in there! How much butter? How much sugar? Is the crust purely graham crackers, butter, and fat? Sometimes, it just ain't worth it, my friends. Not for a whole piece, at least.

But, just as I believe in dessert, I believe we all deserve a whole piece. And we deserve to eat it without feeling guilty.

Did I mention it's breakfast and dessert!?

Healthy Apple Pie In A Cup

Cook Time: 30 Minutes
Servings: 4

Ingredients:
  • 3 Apples
  • 1 tbsp White Wine Vinegar
  • 1/2 cup Oats (Bob's Rolled Oats)
  • 1 tbsp water
  • 2 tsp Cinnamon
  • 2 tbsp Truvia/Stevia/Sugar/Splenda*
  • Whipped Cream
Directions: 
  1. Preheat oven to 350.
  2. Chop Apples into small pieces, about half an inch thick. Place in a medium sized bowl and add White Wine Vinegar, Cinnamon, and Truvia (or sugar sub.), then toss.
  3. Add oats and water, then mix well.
  4. Bake for 30 minutes, then remove from oven and transfer to mugs. Top with Whipped Cream.

*Nutritional values are accurate for Truvia, Stevia, and Splenda.


8.09.2012

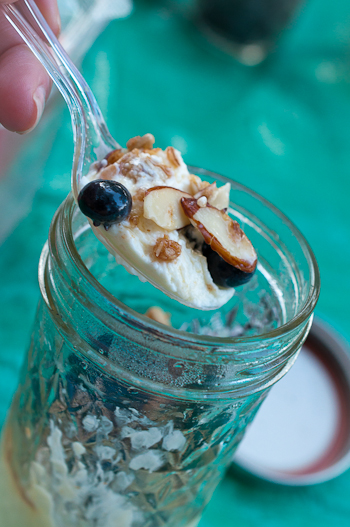
Blueberry Cheesecake In A Jar with Homemade Agave Granola

Pin It Print Friendly and PDF
Get ready for just enough sweetness, just enough tang, and the absolute perfect amount of creamy goodness. Because it's made in a jar, you can pop it in your purse (or a picnic basket!) and enjoy it later! Did I mention it's the healthiest version of cheesecake I've heard of to date?!


I might have figured out the key to life. I love love love cheesecake. And while there's probably no way to make it entirely healthy (I mean, cheese is in the name, and it requires a helluvalot of cream cheese and additional cream), I think I may have found the solution, here. Low fat cream cheese, half and half instead of heavy cream, and truvia in place of most of the sugar. There's still 1 tbsp of regular sugar, so feel free to omit that if you'd like, but I found that it added just the right amount of sweetness to combat the aftertaste that stevia products can occasionally have.

This recipe is delicious. I made it for Justin and I before going on a date night picnic to Wicker Park and found it to be the perfect treat. It's sweet, but not to sweet. Tangy, but not too tangy. And all together wonderful. Many of you asked for the recipe -- so here it is!

Blueberry Cheesecake In A Jar with Homemade Agave Granola


Ingredients:
  • 2 Mason Jars
  • 1 Large Oven-Safe Pot
  • 1/4 cup Truvia or Stevia Extract Powder
  • 1 tbsp Sugar
  • 1 Package Low Fat Cream Cheese, room temperature
  • 1 Egg
  • 1/8 cup Half and Half
  • 1 teaspoon Vanilla Extract
  • 1/2 cup Blueberries
  • 1/2 cup Homemade Granola (or use your own store bought granola, even crumble a honey and oats Nature Valley bar on top!)
  • Honey or Agave Nectar, for drizzling 

Directions:
  1. Preheat oven to 350 degrees.
  2. Fill a large pot of water half full. Be sure to use a pot that is oven-safe (you'll be putting the whole pot into the oven later) and fill it deep enough to cover half of your mason jars, once you add them.
  3. Combine sugar and cream cheese and mix together until smooth. 
  4. Add the egg and mix well until everything is the same color and consistency.
  5. Add half and half and vanilla and mix well.
  6. Take the boiling pot of water off of the heat. 
  7. Pour the mixture into the mason jars. This recipe should give you two 1/2 full jars, depending on the size of your jars. Screw on the tops and place them carefully into the pot of hot water so that they are standing up.
  8. Place the entire pot in the oven and bake for 22-26 minutes, or until the edges look firm.
  9. Remove from the oven and let cool. Before serving, add a layer of homemade granola and blueberries. Drizzle with honey or honey-flavored agave nectar. Refrigerate until serving!


8.07.2012

Healthy Homemade Muesli Granola with Agave Toasted Almonds

Pin It Print Friendly and PDF


Granola sounds healthy. But sometimes, it's not. In fact, some store bought granola products can cost you around 600 calories per cup! Not to mention that small amounts of pre-made granola can be quite costly.

Instead, try making your own. Feel free to sprinkle it on yogurtfrozen yogurt, cereal, pudding, and ice cream!

Ingredients:

  • 1 cup Dried Muesli (If you can't find Muesli, feel free to buy dried oatmeal, and just add in 1 tablespoon of raisins, if desired).
  • 2 tablespoons Sliced Almonds (If you can't find sliced almonds, feel free to substitute whole almonds or any other nut)
  • 1 tablespoon Light Brown Sugar
  • 1 tablespoon Agave Nectar (I used honey-flavored Agave Nectar)
Directions:
  1. Preheat the oven to 350.
  2. Combine dried Muesli (or oats), Sliced Almonds, and Light Brown Sugar in a bowl. Toss/mix until well mixed.
  3. Drizzle Agave Nectar on top. Use clean fingers to massage the Nectar into the mix, until the mixture begins to clump together. It should be a crumbly mixture.
  4. Cover a cookie sheet with aluminum foil or parchment paper, then spray with Canola Oil (or any oil spray). 
  5. Drop the crumbly mixture onto the foil/parchment paper and spread out so that it forms one layer.
  6. Bake for 15-20 minutes, or until the granola begins to harden.
  7. Let the granola cool and dry for at least 30 minutes. Then, use with your recipes!
Great Recipes To Use It In:


6.26.2012

Blueberry & Chambord Patriotic Cocktail

Pin It Print Friendly and PDF
This cocktail is... complicated. On the front end, a burst of delicious blueberries and black raspberry liqueur speaks of freshness. A moment later, a rich, vanilla flavor creeps in, the remnants of well-infused Chambord.


Summer is, by far, my favorite time of year. I know I'm not alone in this, but I feel it very strongly. I pretty much whine and moan all winter, complaining about how much I despise Chicago winters. I even went down South to Memphis, Tennessee for 4 years of college, and thankfully was able to escape the cold... temporarily. I recall, as a kid, my mom trying to remind us to savor our summer days. And I also remember hearing her once say that, once you reach the 4th of July, summer suddenly speeds up and ends soon.

We only get about 10 weeks of wonderful weather each year in Chicago. And the whole city buzzes and hums and glows with delight.

So this year, on the 4th of July, I plan to take that moment to savor the summer. And to be gosh darn patriotic. Because the safety and comfort of wonderful weather deserves some red, white, and blue. And because, let's face it, what is better than a cocktail that fits the occasion? St. Patty's Bombs on St. Patty's Day. Whiskey Apple Cider in a mug while you sit in front of a fire next fall. And this delicious patriotic cocktail on the 4th of July.

Notice the Chambord? It's a french liqueur made of raspberries, blackberries, various herbs and spices and some vanilla added in. Why's it in this cocktail? Hello, people. The French helped us gain our independence, did they not? ;-) Gotta pay a little... homage. 

Blueberry & Chambord Patriotic Cocktail

Servings: 1 per recipe
Ingredients:
  • Ice Cubes
  • 1.5 ounces Vodka
  • 1 ounce Chambord (if you don't have Chambord, a cranberry juice would only slightly change the flavor)
  • 1 handfull Blueberries
  • ~4 ounces Club Soda
Directions:
  1. Fill a highball glass or tall mason jar with ice cubes. Add Vodka and Chambord.
  2. Add half of the blueberries, then top off with club soda.
  3. Sprinkle remaining blueberries on top and serve!


Related Posts Plugin for WordPress, Blogger...
Blogging tips